
Article
An outline gives you room to work on the shape of an idea. You can move a section, expand a supporting point, compare two branches or concentrate on one scene. As the writing develops, it also helps to step back and see how someone else will read it.
Traverse and Marked make a useful combination for that process. Traverse keeps the writing structured and easy to rearrange. Marked provides a separate, styled preview alongside it, with proofreading tools and various export options when you are ready to share.
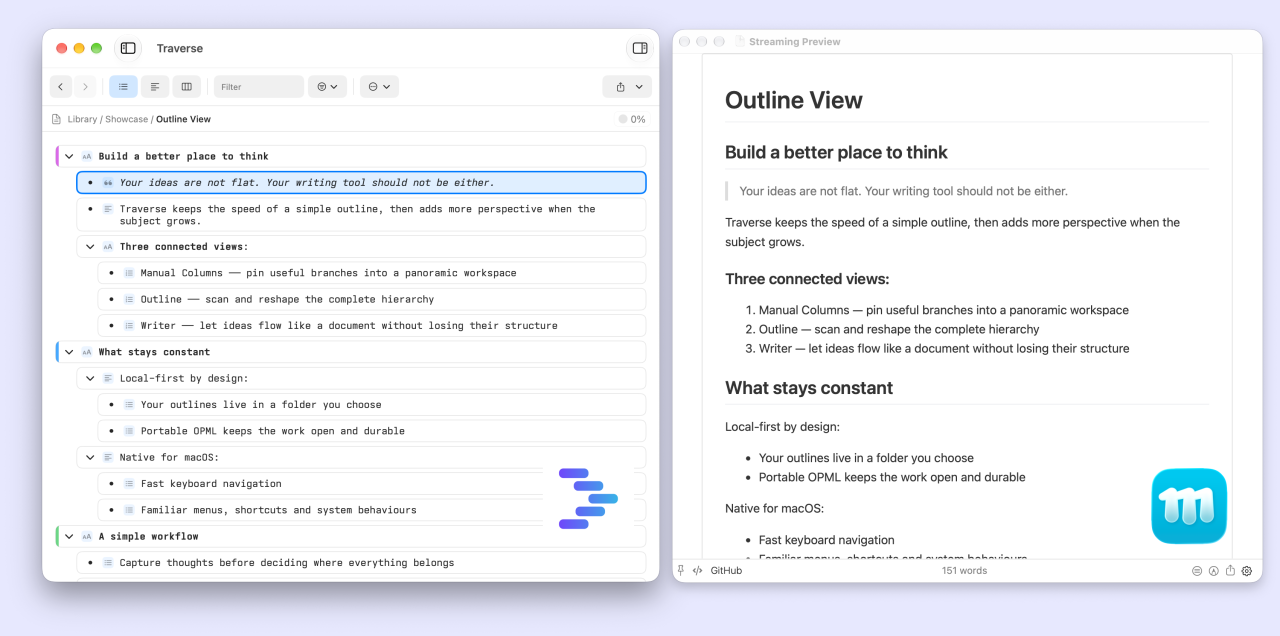
Traverse’s Stream to Marked command connects the two. You can keep editing the outline while reviewing the result, without repeatedly exporting and reopening a file.
Why use the two together?
Traverse’s Writer view already lets you write with the flow of a document. Marked adds another perspective: a preview you can leave visible while using whichever Traverse view suits the work.
For an article, you might keep the section hierarchy open in Columns while reading the prose in Marked. For a project brief, rearrange the main points in Outline view and review their sequence as a document. For a screenplay, organise scenes in Traverse while checking the action and dialogue in a screenplay preview.
The benefit is especially clear when a structural change affects the writing. Move a paragraph and its supporting list together, then read the new transition. Move a scene, then review the surrounding dialogue. You can judge the arrangement and the reading experience at the same time.
Marked also offers proofreading, preview styles and exports, including PDF, HTML and DOCX. That gives you more ways to review and present the work while keeping the editable outline in Traverse.
Marked app
Shape the work in Traverse and review the formatted output in Marked.
Start streaming
- Install Marked and open an outline in Traverse.
- Choose Export → Stream to Marked in Traverse’s menu bar.
- Arrange the windows alongside each other and continue writing in Traverse.
The command appears when Traverse detects Marked. If both Marked 3 and Marked 2 are installed, Traverse uses Marked 3.
Note: For the automatic Fountain detection and source/format rules described below Marked 3.2.28+ is required (along with Traverse 1.4+).
Traverse sends an initial preview immediately and refreshes it as edits are saved. Allow a moment for an edit to reach Marked. The connection uses Marked’s Streaming Preview, so there is no intermediate Markdown or Fountain file to manage.
To finish, choose Export → Stop Streaming to Marked. When you open a different outline in Traverse, you can start streaming again for that document.
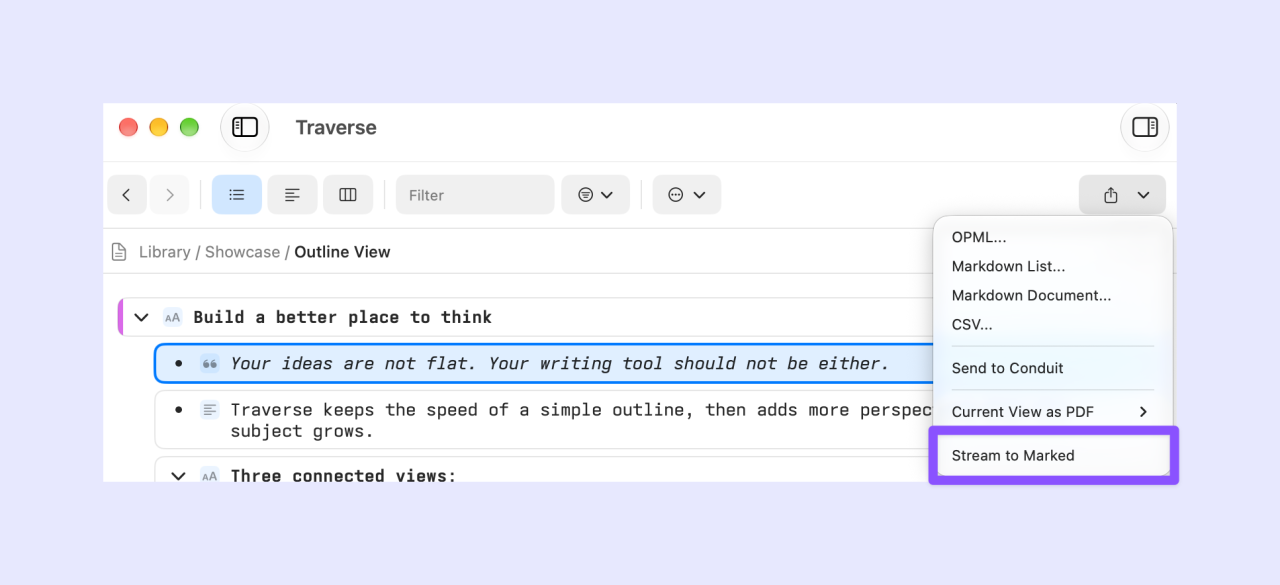
Three formats, chosen automatically
Traverse chooses what to send from the document’s built-in attributes. You do not need to select a streaming format separately.
| Document setup | Content sent to Marked | Streaming format |
|---|---|---|
| Fountain attribute enabled | Fountain screenplay text | fountain |
| Type attribute enabled | A Markdown document using the nodes’ roles | markdown |
| Neither attribute enabled | A nested Markdown list | outline |
This is a document-level choice. A Type document containing only Body nodes still sends markdown. An ordinary outline containing a line that looks like a heading still sends outline. Switching between Writer, Outline and Columns does not change the format.
Note: Traverse Pro is required to create documents with Type or Fountain attributes (though you can open the demo files below to see these features in action even without Pro!).
Fountain: review a screenplay
When Fountain is enabled, Traverse turns the assigned screenplay roles into Fountain syntax. Scene headings, action, character cues and dialogue are sent as screenplay text, rather than as nested bullets.
With support for the stream’s fountain label, Marked automatically uses its Fountain rendering. You can work on the scene hierarchy in Traverse and review the script’s presentation beside it.
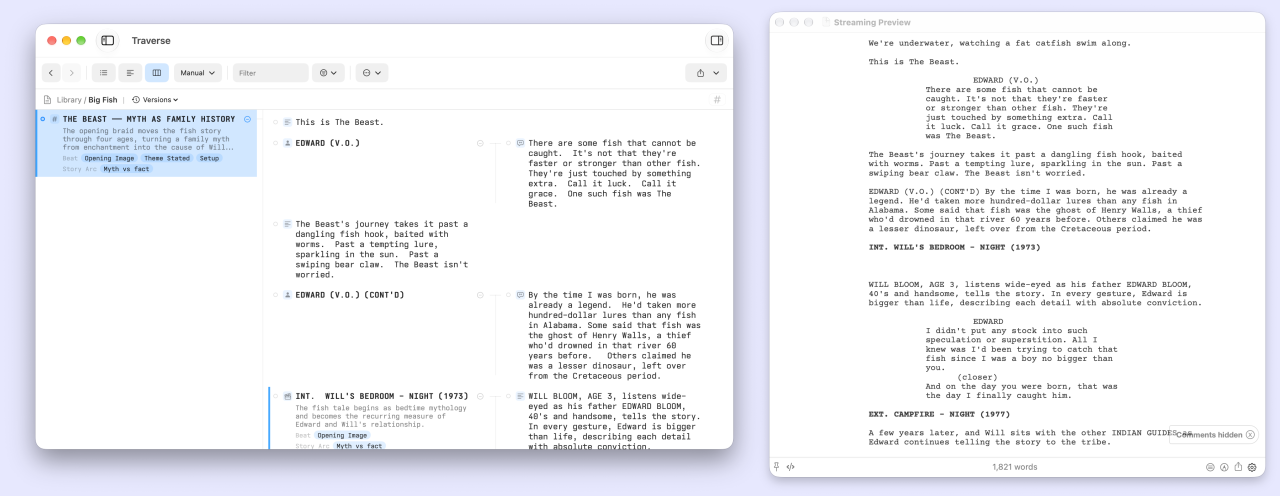
Download: Open the Big Fish
.opmlfile in Traverse, then choose Export → Stream to Marked. Fountain is already enabled, so Traverse sends it asfountainautomatically.
For more information on creating fountain-based scripts with Traverse see our blog post Writing Screenplays with Fountain in Traverse.
Markdown: read the outline as a document
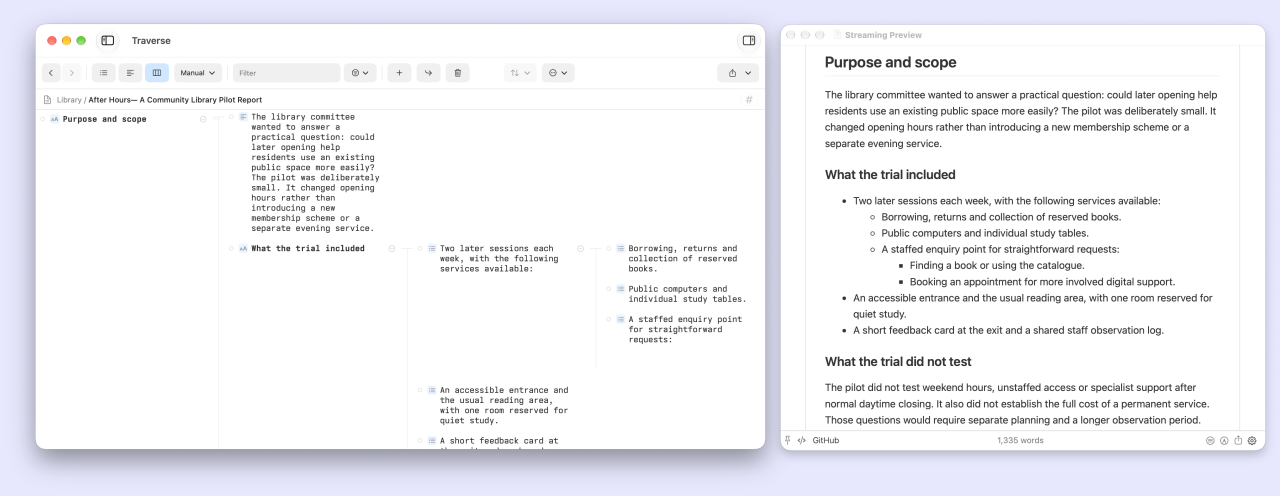
With Type enabled, Traverse turns the outline into a Markdown document. Heading nodes become headings, Body nodes become paragraphs, and quotations and lists keep their roles. You can work on the structure in Traverse while reading the resulting report or article in Marked.
To try this with a complete document, we have created After Hours — A Community Library Pilot Report. It is a fictional report about extending a community library’s evening opening hours, with an executive summary, findings, recommendations, a delivery plan and limitations. All of its organisations, comments and findings are invented for the demonstration.
Download: Open the After Hours sample report
.opmlfile in Traverse, then choose Export → Stream to Marked. Type is already enabled, so Traverse sends it asmarkdownautomatically.
The report includes three levels of headings, ordinary paragraphs, quotations, bullets, nested bullets and numbered recommendations. There is enough content to compare the outline’s structure with the flow of a finished document.
Once it is streaming, try a few edits in Traverse and watch how the preview changes:
- Move a branch. Under Recommendations, move one recommendation above another. Its supporting bullets move with it, and Marked shows the new order.
- Change a node’s Type. Select one of the visitor or staff quotations and change its Type from Blockquote to Body. Watch it become an ordinary paragraph in Marked, then switch it back.
- Mark a branch as Draft. Mark Delivery plan as Draft. That section and its children stay in Traverse but are omitted from the Markdown preview. Remove Draft to bring them back.
Allow a moment for Traverse to save each change and for Marked to refresh. You can undo your experiments when you have finished.
Try switching between Outline, Columns and Writer view as you do this. The streaming format remains markdown; it is the document’s Type attribute that determines the format, rather than the view you happen to be using.
For more about building documents this way, see Writing Markdown Documents with Type in Traverse.
Choose what belongs in the preview
Streaming uses Traverse’s export settings for the relevant format. Review Settings → Export before you start: Markdown Document controls which notes and document elements are included, Fountain controls screenplay options, and Markdown List controls numbering for ordinary outlines.
If you want the sample report’s document title above its sections, enable Use document title as H1 in the Markdown Document options. The section and subsection headings will then follow beneath it. If you change export settings during a session, stop and restart streaming to apply them.
Focus affects the scope too. Return to the full outline before starting if you want to read the whole report; focus on a branch when you want to concentrate on one part.
Preview an ordinary outline
A report benefits from headings and paragraphs, but a working outline is often clearest as a hierarchy. When a Traverse document has neither Type nor Fountain enabled, the stream is a nested Markdown list, identified as outline.
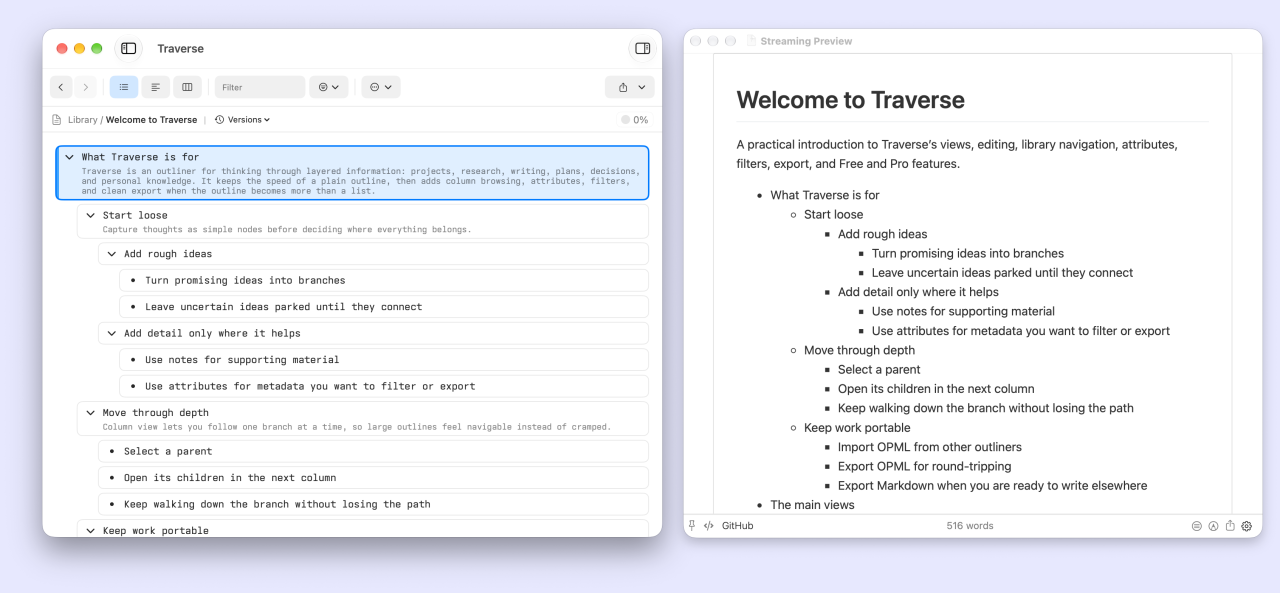
Welcome to Traverse, the document included with the app, is a useful example: it has several branches to explore and uses the ordinary outline format.
Open or refresh Welcome to Traverse
Choose Help → Open Welcome Document in Traverse.
- If the Welcome document is missing from your library, Traverse adds the built-in version and opens it.
- If a copy already exists, choose Open Existing to use it, or Replace with Latest to restore the current built-in version.
Replace with Latest discards changes you have made to that Welcome document. Use Open Existing if you want to keep your edits, or save a separate copy before replacing it.
For this example, use the built-in Welcome outline with neither Type nor Fountain added. That ensures its streaming format is outline.
Stream it to Marked
With Welcome to Traverse open, choose Export → Stream to Marked. In Marked, select any theme you like from the preview’s style menu. Keep the two apps alongside each other and compare the Welcome document’s branches with the rendered list.
Try a couple of themes to see how the same outline reads with different typography and spacing. You can start using this workflow straight away with Marked’s existing styles.
Try our theme for outlines
We have also developed a theme that works particularly well with outlines of this type. It gives nested branches a cohesive presentation, with consistent bullets, subtle guides and spacing that makes the hierarchy easy to follow.
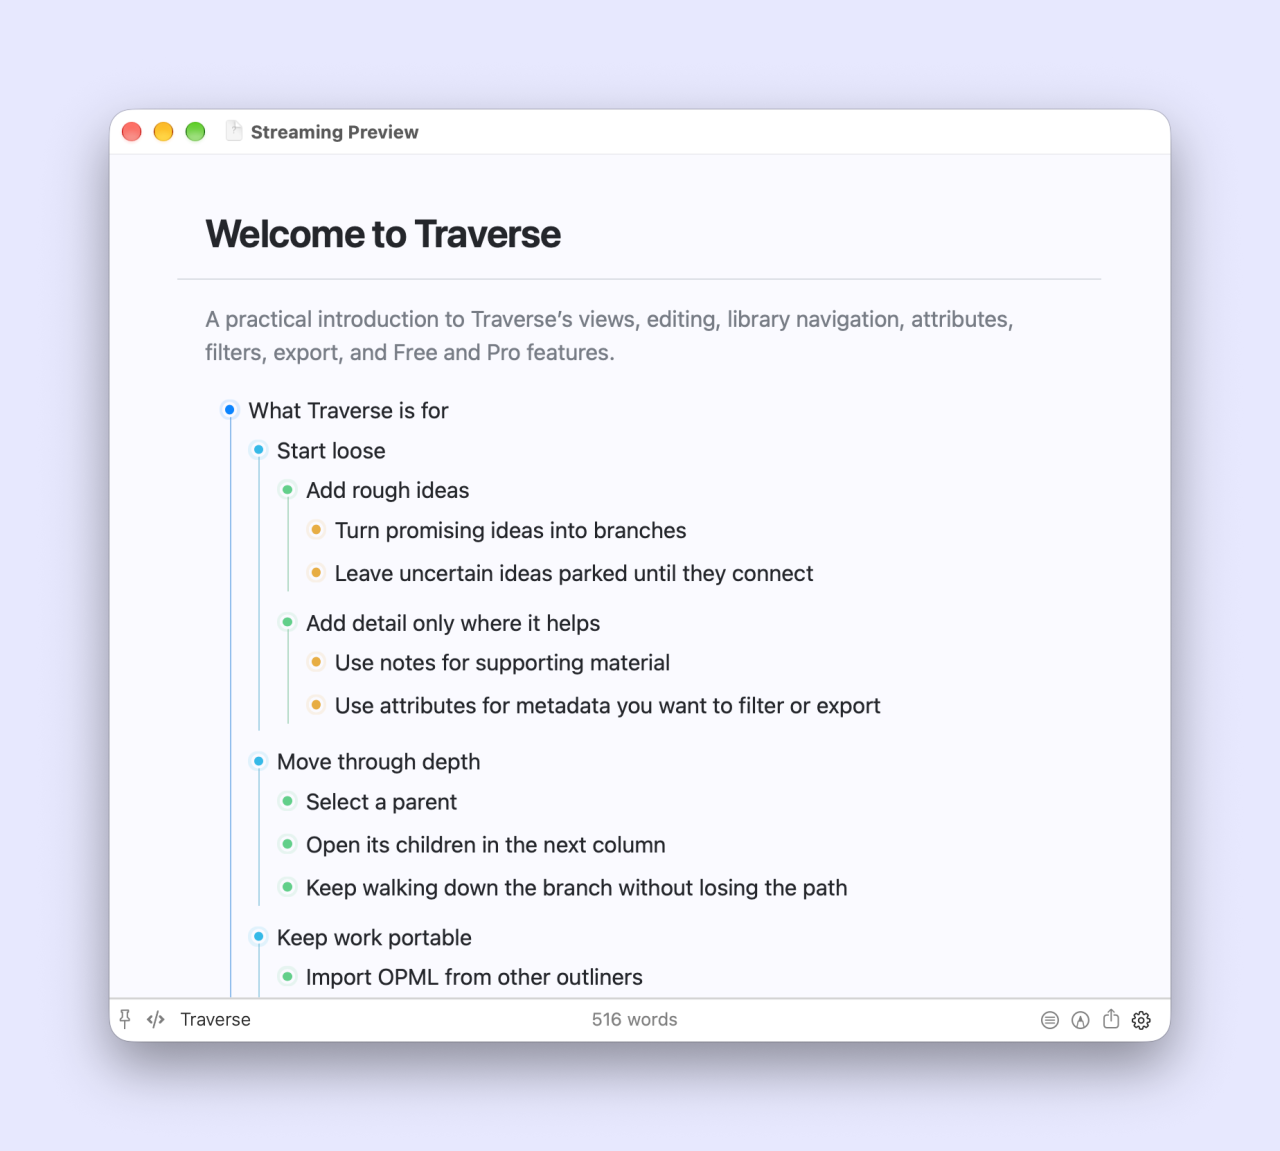
If you like the result, you can install it in Marked and then create a rule that selects it automatically whenever Traverse sends an ordinary outline.
Install the outline style in Marked
Download the Traverse outline CSS file, then install it as a custom style:
- Save the downloaded
.cssfile to your computer. - In Marked, open Settings → Style → Manage Styles….
- Use Add to select the CSS file, or drag it into the Style Manager.
- Make sure the imported style is enabled and note its name.
Marked’s Custom Styles guide explains how to install and manage styles.
Apply the style automatically
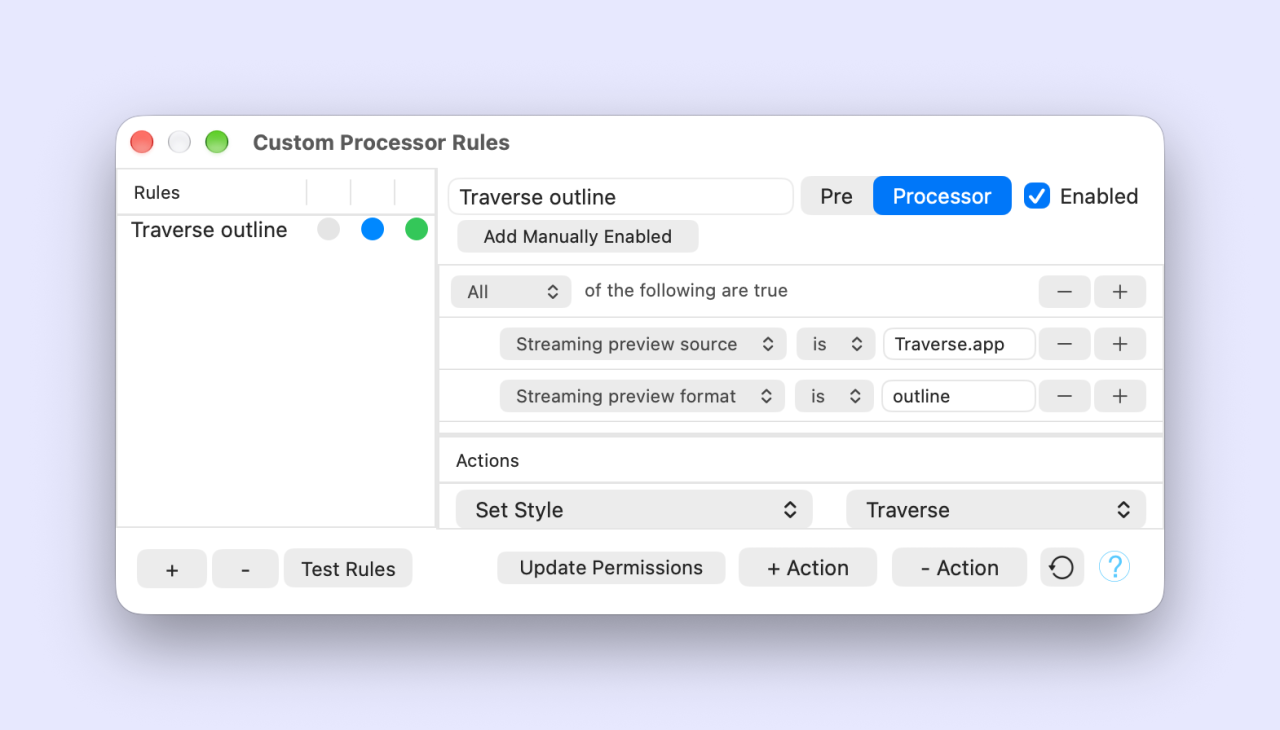
Every Traverse stream identifies its source as Traverse.app and its format as outline, markdown or fountain. Marked’s Custom Processor Rules let you match those values and choose a style for the matching preview.
In Marked, open Settings → Processor → Custom Rules. Add a rule named Traverse — Outline, set it to Processor, and make sure it is enabled.
Require All (AND) of these conditions:
Streaming preview source is Traverse.app
Streaming preview format is outline
Choose is for both comparisons and enter the values without quotation marks. Then add a Set Style action and select the Traverse style you installed. Marked’s Custom Processor guide covers the editor and available actions.
The two conditions work together: the source identifies Traverse, and the format distinguishes an ordinary outline from a Type-based report or Fountain screenplay.
Check the automatic style
Return to Welcome to Traverse, stop the existing stream and choose Export → Stream to Marked again. Marked should now select the downloaded outline style automatically.
Keep Traverse and Marked alongside each other and compare the Welcome document’s branches with the styled list. It is the same content in two useful forms: an outline you can navigate and edit, and a separate preview for reading.
If the style does not appear, check that it is installed and enabled, the rule is enabled, both conditions are in an All group, and Set Style selects the right style. If you have added Type or Fountain to your Welcome document, it will send a different format and will not match this rule.
You can use the same approach for the sample report: create a separate rule matching Traverse.app and markdown, then choose a prose style. Each format gets a presentation suited to the writing, without changing the source document.
Try the three workflows
The Big Fish script demonstrates Fountain, the After Hours report demonstrates Type-based Markdown, and Welcome to Traverse demonstrates an ordinary outline. Preview it with any theme you like, or use our outline theme and automatic style rule.
Open the example closest to your own work, start streaming, and make a small edit. Traverse keeps the structure available as the writing develops, while Marked gives you room to review how it reads.
Traverse
Shape the work in Traverse and preview it in real-time in Marked.