

Article
The first time you plan a project, prepare a workshop or review a source, it makes sense to build the structure as you go. The fifth time, rebuilding the same headings and checklists is friction—and it creates small inconsistencies that make the process harder to trust.
Traverse provides two levels of reuse:
- A Template creates a complete new outline from a source document.
- A Snippet inserts a reusable group of child nodes into the outline you are already editing.
They are both ordinary Traverse outlines stored in special library folders. That is important: you build and improve them with the same tools you use everywhere else, and you can see exactly what will be reused.
This guide explains when to choose each one and walks through setting up both systems.
Template or Snippet?
Use a Template when the new work should begin as a complete document.
Examples include:
- A standard project plan with phases, decisions, risks and review points.
- A research map with branches for questions, sources, claims and gaps.
- A report or article structure with Type roles already assigned.
- A screenplay framework with Fountain roles and title-page conventions.
- A recurring meeting, workshop or client-engagement outline.
Use a Snippet when only one branch needs to be repeated inside an existing document.
Examples include:
- A definition-of-done checklist beneath a task.
- A source-evaluation structure beneath a research item.
- A scene-review checklist inside a screenplay plan.
- A standard discovery phase inside a larger project.
- A decision record with options, evidence and outcome branches.
A simple test is: Should this action create a new outline, or add children to a selected node? The first is a Template; the second is a Snippet.
Applying Templates and Snippets requires Traverse Pro. Their source documents remain visible in the library, so the reusable system is never hidden from you.
How Traverse recognises reusable sources
Traverse uses two specially named folders at the top level of its library:
_templates_snippets
An OPML outline anywhere inside the _templates hierarchy is a Template source. An outline directly inside _snippets is a Snippet collection.
The folders are shown with distinctive icons and colours. If they are hidden, right-click the main Library folder and choose Show Special Folders.
Keep the specially named _templates and _snippets folders themselves at the top level of the library.
You can create ordinary nested folders inside _templates to organise a larger collection—for example, _templates/Writing/Reports or _templates/Projects/Client work. The From Template menu mirrors that folder hierarchy.
Snippets use a different organisation model: each outline directly inside _snippets is already a named collection, and its top-level nodes become the choices within that collection. Nested folders inside _snippets are therefore not used as Snippet sources.
Tutorial 1: create a project Template
We will create a reusable outline for small client projects.
Step 1: create the Templates folder
In the library sidebar:
- Select the main Library folder.
- Create a new folder.
- Rename it exactly
_templates.
If the sidebar immediately gives the folder the Template appearance, Traverse has recognised it.
Step 2: create the source outline
Select _templates and create a blank outline. Give the file and document a clear name such as Client project. If you already have several Templates, create a nested folder such as Projects first and place the source there.
The document title is used as its display name in the From Template menu, so name it for the starting point it provides rather than for a particular past project.
Traverse shows a warning in the workspace: Template source. Edits change this template. That helps distinguish the reusable source from an outline created from it.
Step 3: design the repeatable structure
Add a structure such as:
Try it directly: Copy the example below and paste it into a blank Traverse outline. Each line becomes a node, and Traverse turns the leading indentation into parent-child hierarchy automatically.
Context
    Background
    Desired outcome
    Constraints
Discovery
    Stakeholders
    Questions
    Existing material
Plan
    Milestones
    Risks
    Decisions
Delivery
    Work in progress
    Review
    Handover
Retrospective
    What worked
    What changed
    What to reuse next time
Keep prompts short enough to replace or expand. A useful Template creates momentum without pretending to know the details of the future project.
Step 4: include the document setup that should repeat
A Template copies more than node titles. Configure the source with the elements the next outline should inherit:
- Built-in attributes such as Task, URL, Mark or Note.
- Custom attributes such as Owner, Priority or Stage.
- Default Lookup values.
- Type roles for a document-oriented workflow, or Fountain roles for a screenplay workflow.
- Numbering style and levels.
- Document metadata and default view.
- Notes, Draft flags, URLs, Marks and task states that genuinely belong in the starting point.
Avoid leaving real client names, live URLs or completed task states in the source unless they are intentionally part of every new project.
Step 5: create a real outline from the Template
Select the normal library folder in which the new project should live. Open New Outline, choose From Template, then select Client project.
Traverse creates and opens a new OPML outline in the selected folder. It gives the new document its own identity and fresh node identities, while copying the Template’s structure, attributes, numbering and metadata.
Rename the new outline for the actual project and begin filling it in. It is now independent: changes to this project do not alter the Template, and later edits to the Template do not rewrite projects already created from it.
Step 6: improve the source deliberately
When a real project reveals a better structure, decide whether the improvement belongs in the reusable source.
Open the outline inside _templates and edit it there. The orange Template-source warning confirms that your changes affect future outlines. This separation lets the Template evolve without surprising existing work.
Step 7: organise a growing Template library
As the collection grows, create folders beneath _templates and move Template source outlines into them. A structure such as this keeps related starting points together:
_templates
    Writing
        Article
        Report
        Documentation
    Projects
        Client project
        Product launch
    Screenwriting
        Feature screenplay
        Episode outline
The folders become nested menu groups when you create a new outline From Template. Moving a source changes where it appears in the menu, but it remains an ordinary editable OPML file.
Tutorial 2: create a Snippet collection
Snippets use one extra level of structure because a single source outline can hold several reusable choices.
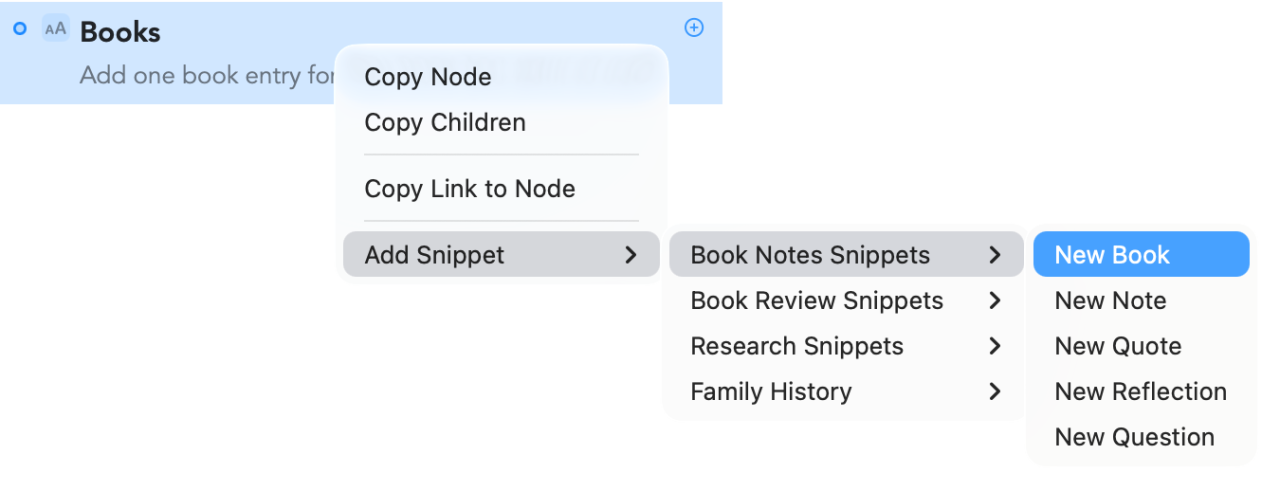
We will create a collection called Project tools with two Snippets: Decision record and Review checklist.
Step 1: create the Snippets folder
At the top level of the library:
- Create a new folder.
- Rename it exactly
_snippets. - Select it and create a blank outline called Project tools.
The document title becomes the first-level menu name. Traverse labels the workspace Snippet source.
Step 2: understand the wrapper-node pattern
Each top-level child of the Snippet source is a choice in the menu. Its children are the content that gets inserted.
Build this structure:
Try it directly: Copy the example below and paste it into a blank Traverse outline. Traverse creates the nodes and preserves every indentation level, so the two Snippet wrappers and their children arrive already organised.
Decision record
    Question
    Context
    Options
        Option A
        Option B
    Evidence
    Decision
    Consequences
    Review date
Review checklist
    Is the intended outcome clear?
    Are the important assumptions visible?
    Has the owner been identified?
    Are risks and dependencies recorded?
    Is the next action unambiguous?
Here, Decision record and Review checklist are wrapper nodes. They appear as menu choices but are not themselves inserted. Selecting Decision record inserts its children—Question, Context, Options and the rest—beneath the target node.
This design gives the menu a readable label while letting the selected node in the destination act as the branch’s natural parent.
Do not leave a Snippet wrapper empty. A choice without children has nothing to insert.
Step 3: add attributes where the inserted branch needs them
You can assign Task states, Notes, Marks, URLs, custom values, Type roles or Fountain roles to the nodes inside a Snippet.
When the Snippet is inserted, Traverse also merges compatible attribute definitions from the source into the destination document. New custom definitions are added, and default values for matching Lookup keys are combined.
Design shared keys consistently. If priority means the same thing everywhere, use the same key and field type. Avoid using the same key for different concepts in different Snippet collections.
Type and Fountain remain mutually exclusive at the document level. Keep structurally typed Snippets compatible with the outlines that will receive them—for example, use Type-based writing Snippets with Type documents and Fountain scene Snippets with Fountain documents.
Step 4: insert a Snippet
Open an ordinary project outline and select the node that should receive the reusable branch.
You can insert in several equivalent ways:
- Use Add Snippet to Node in the toolbar.
- Open Outline → Add Snippet to Node from the menu bar.
- Right-click a node and choose Add Snippet.
Choose Project tools → Decision record.
Traverse adds fresh copies of the Snippet’s children beneath the selected node and selects the first inserted child. Because the nodes are copies with new identities, editing them does not affect the source or other uses of the Snippet. The whole insertion is one undoable action.
Step 5: test the result, not only the source
After creating a Snippet, insert it into a disposable outline or a safe test branch. Check that:
- The correct nodes are inserted.
- They land beneath the intended parent.
- The wrapper label is not unexpectedly needed as content.
- Notes and attributes arrive as intended.
- Type or Fountain roles fit the destination.
- The first inserted node is a sensible place to continue working.
This small test catches most structural mistakes immediately.
Designing reusable structures that stay useful
Write prompts, not examples disguised as prompts
“Stakeholders” is a reusable prompt. “Alice, Morgan and the procurement team” is content from one project. Template and Snippet sources should contain the first unless the second really recurs every time.
Keep defaults meaningful
An empty Task is often useful because it signals work to complete. A task already marked Done usually is not. A default Stage of Idea may help; a due date copied from the day the source was created probably will not.
Split collections by context
One _snippets folder can contain multiple Snippet documents. Use those source documents as clear collections—Project tools, Research tools, Writing tools—rather than placing dozens of unrelated choices in one menu. Use nested folders to organise Templates, not Snippets.
Prefer small Snippets
A Snippet should save work without overwhelming the target branch. If the reusable structure has several major phases and document-wide settings, it may want to be a Template instead.
Treat the sources as part of the system
Review Template and Snippet sources occasionally. Remove prompts that no longer help, clarify ambiguous labels and promote improvements that have proven themselves in real work. Reuse becomes valuable when it captures learning, not merely repetition.
The difference in one sentence
A Template says, “Start a new piece of work this way.” A Snippet says, “Add this proven piece of structure here.”
Together they let Traverse hold not only your outlines, but the methods you have developed for making those outlines effective.
Traverse
Turn the structures that work into reliable starting points for the next project, document or decision.